Saturday, May 30, 2009

Maelyn

This is Maelyn.

Maelyn up closee


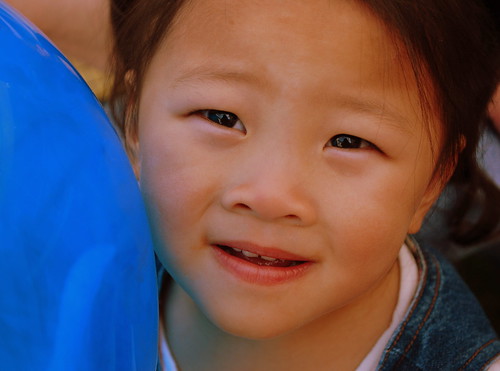
Just look at that gorgeous face.

Maelyn chair3


She is the daughter of my friends Steve and Tammy.

I just can't get over how adorable this child is.

She had a big blue balloon tethered to her wrist. It was her 3rd balloon of the day and she wasn't lettin' it get away.

Maelyn balloon


We went on a dandelion hunt after she saw the picture of one on my camera and asked "What flower is that?". I told her it was the kind of flower that you blow on and make a wish with and she looked up at me and in the sweetest little voice you can imagine said "Oh let's go find one!". So off we went.


Maelyn chair2

Maelyn chair

We looked all over for one, but as luck may have it, we couldn't find a single "puffy" one. So we sent Evan off to hunt for one. Meanwhile Maelyn did find a dandelion in our yard.

Maelyn flower1

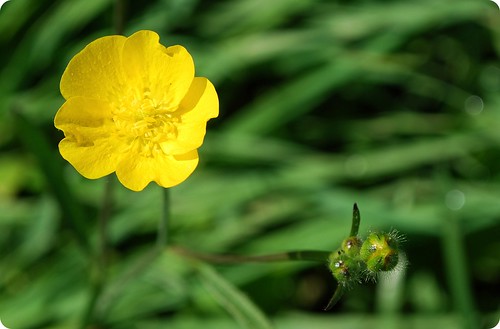
"A yellow flower!" she said as she picked it up and smelled it.

Maelyn flower

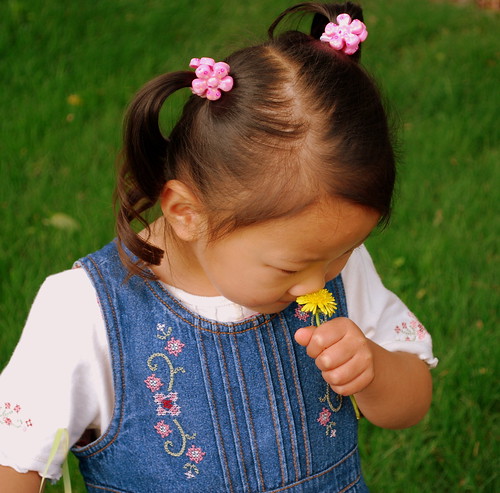
I didn't dare tell her it was a dandelion too, that would have been way too confusing for a 2 year old.

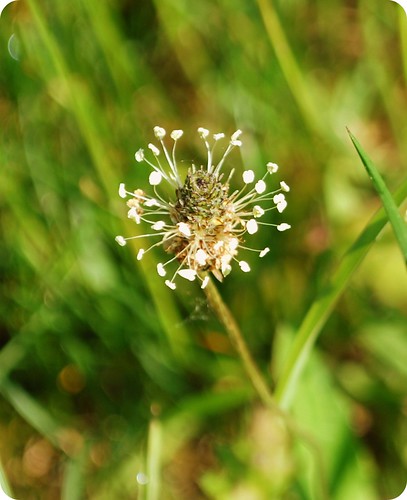
Evan came through and found the one lone dandelion over in a vacant field. Maelyn was thrilled. So thrilled in fact that in her excitment, she let that dandelion get a little too close to her mouth.

Half that dandelion ended up in her mouth!

We had to pick out those little dandelion helicopters, but then she was good to go and off she went blowing away every last helicopter off the half that was left.

Did you make a wish?
"Yes!" she said.
"Don't tell me or it won't come true" I told her.
"Okay" she happily obliged.

Maelyn dandy1

Maelyn dandy3

Maelyn dandy2

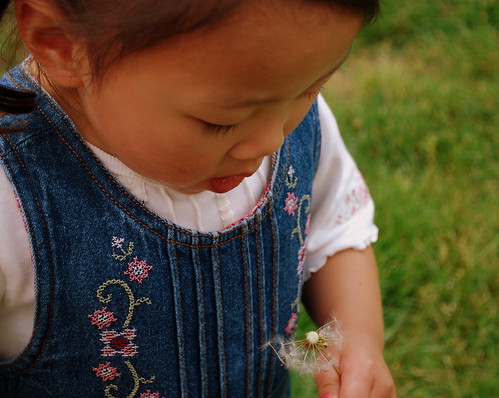
Oh to be two again when all it took to make a great day was a big blue balloon, a little yellow flower and a dandelion to wish on.

Maelyn balloon cu

Friday, May 29, 2009

Snickerdoodle Muffins

SD Muffin CU

I’ve had a really busy few weeks. We have been working out in the yard so much, that I am really starting to miss my kitchen. With all the activity going on outside, I don’t see much of inside during the first few months of spring. We’ve been cooking on the grill just about every night. My stove never got such a rest.

The gardens are planted, the decks are stained, the patio sets are up, the flowers are planted, and we are nearing the “finishing touches” stage. All of our hard work will be rewarded with long nights by the fire, lazy afternoons in the gazebo with a big glass of iced tea and a good book (I’m currently half way thru David Lebovitz’s The Sweet Life in Paris. Great read filled with great recipes) and lots of dining out (I love my gazebo, but I hate you mosquitoes).

I know I haven’t posted many recipes lately, but I’ve got a few new ones up my sleeve for this weekend, so stay tuned for more. For now these Snickerdoodle muffins will have to hold you over.

SD Muffins batter

I’ll admit I pulled this post out of the archives, but that doesn’t make it any less delicious.

A few months back I went searching for a quick and easy muffin to make for the kids for breakfast. I had the usual weekend boarder (what’s a weekend without an extra kid? I have no idea) I came across these on What Geeks Eat. What kid doesn’t like Snickerdoodle flavored anything? Evan’s friend Brandon, whose list of “likes” is literally 10 foods long, loved them. Now that’s saying something.

These were the perfectly easy to make and perfectly deliciously to eat.
You can find the recipe here.

SD Muffin knife

Tuesday, May 26, 2009

Chocolate Sheet Cake

Chocolate Sheet Cake CU1

Need a cake to feed a crowd? Something luscious and chocolaty yet still light enough not to overly fill ya up? This is one moist chocolate cake. You will sink your teeth into it and smile. It has an absolutely rich and creamy, finger licking frosting. I could eat that frosting by the cup fulls I tell ya. The best part is this cake is quick and easy to make too. You can make the cake the night before your party or event and frost it the next day like I did.

I used a half sheet pan and it turned out perfect.

I’m still dreaming of that frosting. I kid you not.

Chocolate Sheet Cake


Printable recipe
Taste of Home – Prize Winning Recipes 2009
2 sticks, softened
2 cups sugar
4 eggs
2 teaspoons vanilla
2 ¼ cups cake flour
1 teaspoon baking soda
1 teaspoon salt
1 cup buttermilk
3 ounces bittersweet chocolate, melted

Frosting
¼ cup baking cocoa
1/3 cup milk (bit more if needed)
1 stick butter, cubed
1 teaspoon vanilla
3 ½ cups confectioners’ sugar

In a large bowl cream the butter and sugar until light and fluffy. Add the eggs, one at a time, beating well after each addition. Beat in the vanilla.

Combine the flour, baking soda and salt and add it to the creamed mixture alternately with buttermilk, beating well after each addition. Stir in the chocolate until combined.

Pour into a greased 15in x10in x 1in baking pan. Bake at 350 for 23 – 27 minutes or until toothpick inserted into center comes out clean. Cool on a wire rack.

For frosting:
In a small saucepan bring the cocoa and milk to a boil over medium heat, stirring occasionally. Remove from the heat and stir in the butter and vanilla until the butter is melted. Whisk in the confectioners’ sugar until smooth. My frosting was a little too thick at this point so I just added in a bit more milk until it was the right consistency. Drizzle over cake and spread quickly. Let stand until set.


Chocolate Sheet Cake fork


Chocolate Sheet Cake fork empty

Right after I took that photo I totally licked every drop of frosting off that fork.

Saturday, May 23, 2009

Farmers Market

We made our first venture out to the farmers market last Saturday. The pickins were scarce seeing that it is so early in the season for us here on the East coast. There were a number of booths with a nice variety of seedling for sale, in fact we bought some beautiful cherry tomato plants that were loaded with blooms for just $1, but the big find of the day was this:

Fig

This my friends is a fig. Quite possibly one of my favorite fruits on earth. I have been searching for a fig for so very long. Imagine how happy I was to walk up to this little booth, and see 4 fig plants! I knew without a doubt, I would be leaving with one.

I spoke to the elderly gentlemen at the booth and learned that he is Sicilian (just like me – bonus points cute little man) I liked him better already. He then proceeded to tell me that his great-great grandfather brought back the original fig trees, which these cuttings came from, straight from Sicily! True Sicilian figs! My little Sicilian heart was swelling with joy. Although he had two kinds of figs, he urged me to get the Sicilian fig and not the Italian honey fig that I was drawn too immediately. He said the Sicilian fig was a better “starter” fig for me. Seeing that he was the fig expert, I went the Sicilian fig. “I’m here every year” he told me. “You see how you do with this one and next year, you get the honey fig”. I couldn’t argue with that.

So my fig is potted and will be moved inside the shed to go dormant this fall. I don’t think I’ll be harvesting any figs this year, but I’m keeping my hopes up, just I case.

My Uncle Luciano who lives in Massachusetts, has a fig tree. Yes, a fig tree growing on the east coast. Not an easy feat I tell you. Each fall he buries the tree so it will survive through the winter and he un-buries it again in the spring. That’s a lot of dedication and effort for some figs.

My little sprout could grow into a tree too, but I’m not so sure I’m up for the whole burying ordeal so I’m going to grow mine in a container, just like the little man at the farmers market does.

I just had to share a few pics of all the delicious breads that we saw too. We picked up a few and also grabbed a couple of bagels to eat when we got home. There is nothing like a freshly baked bagel. So good.

Bagels

Bread

Boule

So I’ll keep you all up to date on the fig progress. I’m hoping that by next year I will have harvested so many figs that I’ll be posting and asking you all to send me your best fig recipes. Fingers crossed.

Thursday, May 21, 2009

I do not want what I haven’t got.

How many people can say that and truly mean it?

I do not want what I haven’t got (yeah so I stole it off Sinead).

As my boys get older and their wants, not needs, become greater, it has lead me to think about the world that my children are growing up in. The world of want. Seems everyone wants more.

Something bigger.
Something better.
Something faster.
Something stronger.
Something prettier.
Something more than what they have.

Why are we never satisfied?

When my oldest was around seven he asked for a Nintendo system, a few years later he wanted a Nintendo 64, after that came the Gameboys, then the Game Cube, the DS, Sega, the Wii, an iPod, and just this past Christmas he got the iPod Touch. Each year they want something bigger and better than the year before. Now his birthday is approaching and he is asking for some other electronic device that I haven’t even heard of. I am really torn with the idea of purchasing yet another item that will just be used for a short time, then tossed to the side when the next new and improved model comes along. I’m not saying cancel the party and bring back all the gifts. It’s still a time to celebrate, but I’m starting to feel like he has grown so accustomed to getting “things” that it’s just part of everyday normal life, second nature to him. He asks, and he receives, but does he truly understand how fortunate he is to have what he does? I’m struggling with what I am showing him by buying more and more for him. What I’m really saying is, never be satisfied with what you have. Even though you have a lot of “stuff” there’s still more and more stuff to be had.

What a terrible thing to teach him.

Are we raising a generation of kids who just expect things? Like it’s there right and privilege to get what they ask for all the time?

So why do I keep doing it? Granted, I can come up with answers. It’s because I love him and want him to be happy. I want him to fit in and have the stuff that all the other kids have. It makes me feel good when I see him happy. I’m fortunate enough that I have the means to buy the things he wants. Those are some of the answers, but are they right answers? Is the basic human instinct of greed just so great that I can’t bring myself to say no? Am I helping him prepare for adulthood by letting him think that you can pretty much get whatever you want as long as you behave well and wait for your birthday or a major holiday? I think I am. I think that the materialistic propaganda that fills our every waking moment on TV and in magazines and newspapers has seeped so far into our heads that now we just think it’s normal to give and give and give and never step back and say….enough. It’s enough.

I’m slowly trying to simplify my life. Stepping back and looking at the big picture and being content with what I have now. My house that’s a little too small is a mansion to the person who is homeless. My small kitchen that I would love to expand is enormous to the person who cooks their meals over a hot plate; my back yard that I’m constantly landscaping would be a blessing to someone who doesn’t have a quiet place to get away from it all or green grass to squish between their toes.

I’m trying to want less and just be happy and grateful for what I have. I have a loving husband, great kids, a loyal family, the best friends anyone could ask for and peace of mind. All the things money can never buy. All the things that fill me up with contentment and love and make me step back and say, “I don’t really need more that what I have”. I may want it, but I don’t really need it.

This is the message and mantra I want to instill in my children:

A simple life is a fulfilled life.

I think I’ll have to change my tune to “You can’t always get what you want”.

Tuesday, May 19, 2009

Espresso Chocolate Chip Muffins

Espresso Chip Muffins in basket

A beautiful Saturday turned into a not so beautiful Sunday this past weekend. It was kinda rainy and gloomy so I knew yard work was out of the question. I did the next best thing to working on my landscape…I baked.

One of the few things I miss during the hot summer months is baking. My time spent with the oven decreases dramatically. Oh there are days I will crank the air conditioning in the kitchen and just go for it, but more often than not I will opt for a dessert that doesn’t involve heating up the oven.

Since my oven heating days are limited, I decided to whip up a batch of these muffins. Although I am a cupcake fiend, I do like cute little muffins too. The kids like it when I make them cause they are easily transportable for lunches.

Espresso Chip Muffins solo

I found this recipe on
Bake or Break and tweaked it a bit by adding in some espresso powder. I refrained from trying any, but Mitch and the kids all said they were delicious as they were grabbing for seconds.

Espresso Chip Muffins stacked


Espresso Chocolate Chip Muffins
Printable recipe
1 ½ cups all-purpose flour
1/3 cup granulated sugar
¼ cup packed brown sugar
½ teaspoon baking powder
½ teaspoons baking soda
½ teaspoon ground cinnamon
½ teaspoon salt
2 eggs
½ cup unsalted butter, melted and slightly cooled
1 teaspoon espresso powder
½ cup milk
1 teaspoon vanilla
1 cup semi-sweet choc chips

Preheat the oven to 375. Lightly grease or line 12 muffin cups.

In a large bowl mix the flour, sugar, brown sugar, baking powder, baking soda, cinnamon and salt.

In a separate bowl, beat the eggs. Melt the butter and then add in the espresso powder. Let cool slightly. Stir in melted butter, milk and vanilla into the eggs. Add to the flour mixture, stirring just until the dry ingredients are moistened. You know the mantra – don’t over mix you muffin!!! Stir in the chocolate chips. Fill muffin cups 2/3 full.

Bake 20 – 22 minutes or until toothpicks inserted into a muffin comes out clean. Serve warm, or hot if you husband can’t wait for them to cool before he takes one.

Espresso Chip Muffins in liner

Saturday, May 16, 2009

Just Dandy

It was warm and sunny today. The perfect kind of spring day. What made it even nicer was that the farmers market opened last weekend. We headed out for our first visit of the season (more on that in another post).

On the way back we rode past a field of dandelions.

I love dandelions.


dandy cu

There is just something very magical about them to me.

Who doesn't like to blow into one and make a wish?

I don't really like them when there in their yellow flower state. I like them all whimsical and fluffy.

There were thousands and thousands of them in the field.

I really wanted to pick up every one and send all those dandelion parachutes into the air....but I think I would have run out of breath and passed out if I took on that challenge.

dandy1

I also came across this little flower/weed. I have no clue what it is, but it looked pretty to me.

weed

There were also tons of buttercups in the field too.

Every time I see one I instantly turn into a 7 year old and hold it under my chin.

Do you like butter???

buttercup cu

Silly question.

Buttercup

Thursday, May 14, 2009

Eggplant Ricotta Bake

Eggplant ricotta bake slice

I don’t get to sit down and watch TV as much as I used to B.C. (before children). There were a lot of TV shows that I loved and watched faithfully back in the 90’s. Northern Exposure was one of my absolute favorites. I miss it. I’m always tempted to purchase all 6 season’s on DVD each time I see them in Sam’s Club, but when would I have time to sit down and watch hours upon hours of TV? I barely have enough time now to watch the shows I tape. What’s that you say? “Oh Lisa tell us, we are so curious to know, what shows do you tape each week and try to watch?”

Well let me start off my saying once the weather gets nice my TV watching drastically decreases to almost nil. We spend most nights in the yard by the fire during the warmer months. During the fall and winter I try to watch what’s on my DVR each week. Here’s my must see list: My Name is Earl, No Reservations, Barefoot Contessa, Good Eats, Big Love, Dexter and Heroes (I’m losing interest in Heroes as of late). Those are my “can’t miss” shows. I also love all the shows that makeover messy and filthy house. Makes my inner OCD cheer loudly! Thank goodness I can cut out all the commercials with the aid of that fast forward button. I end up watching most of those while I’m half asleep on the couch and then I end up re-watching the parts I missed on another day. How did I ever watch TV before I got my DVR?

One of the shows that I usually fast forward extra quickly through (yes there is a “turbo charge” on the fast-forward button) is Everyday Food. I like the show, but some of the recipes are just not appealing to me, so I turbo right through those suckers. Imagine my surprise when in the middle of a blurry speeding haze, I catch a glimpse of eggplant and cheese, ricotta cheese no less. Hmmmm, this put me into re-wind mode and led me to find this recipe for Eggplant Ricotta Bake. Like a lasagna but with eggplant instead of noodles.

I rewound, I watched, I baked, we ate.


Eggplant Ricotta Collage

Eggplant Ricotta Bake

Printable recipe
2 large eggplants (1 to 1 ¼ pounds each)
3 tablespoons olive oil
salt & pepper
1 container (15 ounces) ricotta cheese
(use whole milk for better results)
3 large eggs
1 cup grated Parmesan cheese (divided)
2 tablespoons chopped fresh oregano (or 2 teaspoons dried)
1 tablespoon dried Italian seasoning
2 tablespoons fresh chopped parsley (or 1 tablespoon dried)
1 jar spaghetti sauce (16 ounces)

Preheat the oven to 450. You are going to roast the eggplant on high heat.

Slice the eggplant lengthwise into ¾ inch pieces. You don’t need to peel them, but take off the ends! Lay them on 2 baking sheets that you have greased lightly with cooking spray. Brush oil on both sides of the eggplant and season with salt & pepper. Roast until eggplant is tender and golden, turning halfway through. This should take 10 to 15 minutes on each side. Keep an eye on them! You don’t want them to burn! Turn the oven down to 350.

Meanwhile in a medium bowl, stir together the ricotta, eggs, ½ cup of the Parmesan, oregano, seasonings and parsley. Season with salt and pepper.

Spray an 8x8 inch pan with cooking spray. Lay a forth of the eggplant slices in the bottom of the pan and spread with sauce. Top with another fourth of the eggplant and spread with ½ of the ricotta cheese mixture. Repeat the layers, ending with ricotta. Sprinkle with the remaining ½ cup of Parmesan. Bake at 350 until bubbling and golden, 20 to 25 minutes. Let this cool at least 15 minutes before you cut into it or you will have a goopy mess, and no one wants that.

Tuesday, May 12, 2009

Strawberry Vanilla Ice Cream Pops

StrawVanilla Pop in glass dish

Once spring hits and locally grown strawberries are available I just can’t wait to start eating them. Definitely my favorite fruit of the summer, with blackberries and peaches as a close 2nd and 3rd, I love to eat them and bake with them.

When I saw the recipe for these pops in the May issue of Gourmet, I knew as soon as I laid my eyes on it, that I would be making these. Ice cream and berries together?? That is a total no brainer. Talk about easy, these pops came together in a snap.

Strawberry Vanilla Frozen Pops
Printable recipe
1 lb strawberries hulled and halved
½ cup sugar
2 teaspoons lemon juice
2 pints premium vanilla ice cream

Mash the strawberries in a large bowl with a potato masher or a fork. Transfer to a large nonstick skillet along with the sugar and lemon juice and boil over medium heat, stirring occasionally, until slightly thickened, about 10 minutes. Transfer to a bowl and freeze, uncovered, until cold (about 10 minutes).

Transfer the ice cream to a microwave safe bowl and heat at 30 percent power in 10-second intervals, stirring until softened, about 50 seconds total.

Spread even in a 9x13 inch-baking dish and freeze while strawberry mixture chills. Dollop tablespoons of the strawberry mixture all over the ice cream then swirl it gently through the ice cream with a spoon.

Spoon into molds (or paper cups like I did) and add wooden Popsicle sticks. I used the wide craft sticks. I let the pops freeze for about 20 minutes before I put the sticks in. Freeze until firm, about an hour and a half, or up to 4 days covered.

StrawVanilla Pop with lemon

Saturday, May 9, 2009

Heavenly Days

Put a big dent in veggie and flower shopping yesterday.

I love walking up and down the aisles in the nurseries picking out what plants we'll watch grow, happily harvest and then ultimately consume with great joy. In addition to the plants I already have today I picked up:

dill
parsley
rosemary
thyme
oregano
spinach
Genovese basil
red ruby basil
green beans
eggplant
zucchini
2 kinds of onions
5 kinds lettuce and radicchio
Chinese cabbage
ghostbusters eggplant (small white eggplant)
little fingers eggplant (mini eggplant)
and a bunch of flowers

Basil

White 2

yellow

White

columbine

Germs

Tonight I'm going to kick back, spread out all my garden plans and notes on the table and listen to the soothing voice of Patty Griffin. I heard her on a really beautiful blog I love to visit called
Vermont Harvest . Check it out and see what beautiful primitives Doreen makes.

Lastly, to all the fabulous Mom's I've met out in blogdom who give consistently and are a constant inspiration to me and to their families, I just want to say kudos to you all for "keeping it all together" on a daily basis. Sometimes it's not so easy, but we all seem to get through it.

I hope that tomorrow you enjoy a day of doing exactly what you want to do. For me that will be feeding the people I love, doing a little gardening and just enjoying the grass between my toes again.

Enjoy your Mother's Day.

Toes in the grass


Wednesday, May 6, 2009

Mexican Lasagna

Mexican Lasagna side view

Yeah yeah I know Cinco de Mayo was yesterday.
Why am I posting a Mexican inspired recipe today?
Cause I'm like that. I will not conform dammit! LOL

I actually posted this recipe just about a year ago when I had a crappy little point and shoot camera and had only made it that one time. Since then I have perfected it and it’s really one of my families most requested dinners. Although it looks complicated, it’s comes together really fast since the ingredients for the filling are all made and combined in one pan.

I use the large burrito sizes tortillas and cut them to fit nicely in the pan. I use one whole and about a half of another for one layer.

Since I have a sweet tooth and not a spicy tooth I omit the green chilies, but you can certainly spice this up with more chilies or hot peppers to make it as smokin’ as you’d like.

Mexican Lasagna in pan

Mexican Lasagna
Printable recipe
2 lbs ground beef
1 medium onion, chopped
4 garlic cloves, minced
2 cups salsa (that was the jar for me)
1 can (16 oz) refried beans
1 can (15 oz) black beans, rinsed and drained
1 can (10 oz) enchilada sauce
1 can (4 oz) chopped green chilies (I omitted cause me no like!)
1 envelope taco seasoning
6 large flour tortillas
3 cups (12 oz) shredded Mexican cheese blend, divided (I used 2 bags (Monterey Jack & the Taco blend, so about 4 cups).

In a large skillet, cook the onions under they are just tender, Add the beef and cook over medium heat until meat is no longer pink, add the garlic and cook for a few minutes; drain. Stir in salsa, beans, enchilada sauce, chilies, taco seasoning, and heat through.

Spray a 9×13-baking pan with cooking spray. Layer with 2 tortillas (I trimmed my tortillas with kitchen shears to fit), 1/3 of cheese and a 1/3 of the meat mixture. Repeat with 2 more layers. You should end up with the meat mixture on top. I had about a ½ cup of cheese left so I sprinkled that on top before it went into the oven. Spray a piece of aluminum foil with cooking spray (we don’t want cheese sticking to the foil now do we?) cover tightly and bake for 20 -25 minutes at 375. Uncovered and bake for an additional 5 minutes so the cheese gets nice and bubbly. Once it’s out of the oven you need to let it sit for 10 minutes before you cut into this bad boy or you will have a cheesy mess.

Serve with: Sour cream, sliced ripe olives, avocado, chopped tomatoes, lime, etc.

Mexican Lasagna

Sunday, May 3, 2009

Back to Basics - Egg Potato Salad

Egg Potato Salad WS


Back to basics again, this time its potato salad, a staple at every cookout and summer party. I lump potato salad into the category of “everyone has their own version” recipes. Everyone makes potato salad a bit different, just like lasagna, pasta salad, chicken salad, etc, it’s one of those recipes that is really influenced by what your kind your Mom made, your personal preference, and a little ingenuity. Just for the record, I can’t recall my Mom ever making potato salad. It wasn’t something that my Dad would have eaten (still isn’t). My best friend makes an awesome potato salad; she will only use Miracle Whip in hers. I hate Miracle Whip, but I will eat it in her potato salad. Strange but true.

Mine relies on hard-boiled eggs it give it a more creamy texture. I also add pickle juice and a smidge of apple cider vinegar to give it a tang. I steam my potatoes instead of boiling them. I think it helps them from getting waterlogged so they can suck in all the delicious dressing.

Egg Potato Salad SS

I don’t have a formal recipe by any means. Everything is done by eye, but I will try and jot down what I’m adding and how much, so you too and make a delicious and easy potato salad too.

Lisa’s Egg Potato Salad
Printable recipe
6 medium sized russet potatoes, scrubbed, skin-on, cut into 1-inch pieces
4 hard boiled eggs, chopped
½ cup good mayonnaise
¼ cup sour cream
1-teaspoon ground mustard
1 teaspoon Dijon mustard
3 sprigs of thyme
handful of chives
salt
Mrs. Dash (few shakes)
¼ cup pickle juice
1-tablespoon apple cider vinegar
4 slices bacon, cooked and crumbled

Place a vegetable steamer in a large pot. Fill with water just until it reaches the bottom of the steamer. Place the potatoes on top of the steamer and cook for approximately 15 minutes, or until a knife can slide easily into them. Drain and place into a large bowl.

In a medium size bowl mix the mayo, sour cream, mustards, thyme, chives, pepper, and Mrs. Dash. You can even make this a day before to really let the flavors infuse.

Stir gently into warm potatoes, add the pickle juice, vinegar and bacon and stir gently again. Refrigerate until cold. When I’m serving a crowd I usually sprinkle mine with some paprika and decorate it with some sliced egg, just to make it look prutty.

Sometimes I add red onion. Sometimes I leave out the eggs. I’ve even been known to throw in fresh cubes cukes from the garden. It’s really one of those recipes that you just keep tasting and adding too until you get it just the way you like it.

Egg Potato CU side

Friday, May 1, 2009

Steamers

Steamers in bowl

Here in Rhode Island we call small clams steamers or littlenecks. In my family we always called them streamers. We don’t categorize all clams as steamers. Bigger clams are Quahogs and are usually cut up and eaten in chowda. Although I like Quahogs, I love steamers. If you’re in RI and ask your local fishmonger for clams, you better know what you want. Here’s a little breakdown:

Steamers or Littlenecks = small
Topnecks = medium
Cherrystones = larger
Quahogs = largest

Look for steamers that are tightly closed. Avoid chipped, broken or cracked steamers. I like to buy mine the day I am cooking them.

I store them in the fridge until I am ready to use them, and I give them a soak for about 20 minutes in some water. Why the soak? As the steamer breathes, it will filter water and push out any salt and sand that is in the shell. Some people even put some cornmeal in the water so the steamers will suck it in and spit it out along with any sand. After 20 minutes, they should have cleaned themselves out enough to be ready to cook. At this point I take a little scrub brush and clean off anything on the shell. Most fish markets here sell them labeled “double washed” but I still give mine a good scrub.

Steamers white bowl

Steamers are prominently featured at many Rhode Island cookouts and BBQ’s. It doesn’t hurt that they are fairly cheap here in the Ocean State (during the summer months you can get them for $1 a pound). You simply can’t have a clambake without them. Steamed in white wine, stock, water or beer (my preferred method - beer), these tender little clams are sweet and tender and take just minutes to cook.

Here’s how I like to prepare them:

2 - 3 pounds of steamers
1 can or bottle of beer
3 crushed garlic cloves
½ stick melted butter
lemon

Empty the beer into a large pot and add the garlic. Pour in the steamers, put on the lid and let it come to a boil. I start checking my steamers about 5 minutes after they begin to boil. Once they are open, they are done. If you have unopened steamers – discard! Clammed up steamers – no good! Now dump them into a big bowl.

The "neck" is black and covered with a disgusting wrinkled black membrane. Shuck the membrane; it’s not good eats. If your steamers are particularly gritty, you can pre-dip them in some warm water to rinse them and then dip them in the butter. I always top mine off with a little sprinkle of lemon.

Steamers in my belly always make me think....summer is coming.

Steamers CU