Monday, February 27, 2012

Easy Cheesy Dilly Loaf

Easy Cheesy Dilly Bread

I'm alone this week. Well not totally alone, my kids are here, but my husband is off on a business trip for the week, so for me, my other half is truly absent. Mama no like.

It's the first time we've been separated for this amount of time since we got married. *sniff*

It's just going to be strange going through this whole routine we call life without him for the next 6 days. I told the boys they better pray we don't get a snowstorm cause Papa is the only one who can operate the snow blower. I hope I won't be saying "get out your snow shovels".

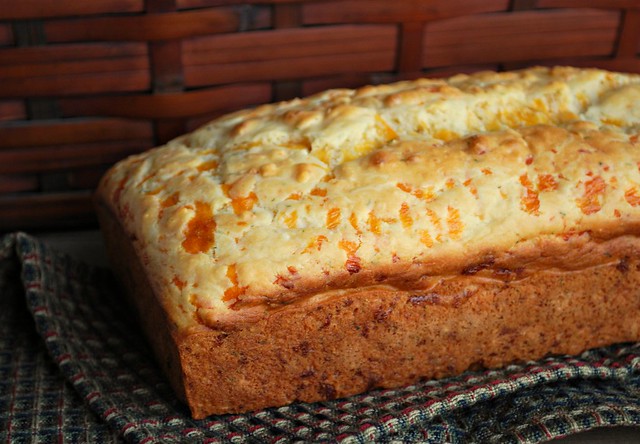
I'll be making lots of quick and easy stuff this week and let me tell you it doesn't get much quicker or easier then this Easy Cheesy Dilly Loaf.

I threw this together in like 5 minutes and 40 minutes after that we had a delicious warm loaf of bread.

Aside from eating this straight outta the pan, I sliced this thin, toasted it and then make a delicious turkey, avocado and cheese sandwich. Yum! This would also make an amazing grilled cheese. Can you imagine oozing cheesy goodness sandwiched between this stuff or served up with a pipin' hot bowl of soup?

The possibilities are endless!

Make it! Trust me, you'll be so glad you did.

Easy Cheesy Dilly Bread1


Easy Cheesy Dilly Loaf
recipe from Betterrecipes.com
3 cups Bisquick
1 ½ cups sharp grated cheddar cheese
1 tablespoon of sugar
1 1/14 cups milk
1 egg, lightly beaten
1 tablespoon vegetable oil
½ teaspoon dill weed
½ teaspoon dry mustard
½ teaspoon salt

Oven to 350. Generously grease a 9x5 loaf pan. In a large bowl combine the Bisquick, cheese and sugar. In a second bowl combine the remaining ingredients and mix well. Stir the liquid mixture into the dry mixture blending thoroughly to remove any lumps. Turn the batter into the pan and bake until golden brown (about 40 minutes).

This bread can also be baked in a 6 cup bundt pan.

Tuesday, February 21, 2012

Cheeseburger Pasta

Cheesebuger Pasta 1

Growing up our house was "the house" in the neighborhood that everyone wanted to hang out at. We had a huge basement with a kitchen, a ping pong table and a pool table. Free pool. No quarters necessary. Needless to say, all the guys wanted to be there.

My grandmother and my Mom (we lived in a duplex) would happily provide homemade pizza, munchies and an endless supply of baked goods.

My Gram would often embarras me by loudly yelling down the stairs whenever possible, "Lisa Anne". Never just Lisa, always Lisa Anne. She never just said it, she sang it.

My friends loved spending time at that big old house on Wood Street, a house my father and granfather built back in the early 70's. I was always wishing that we could be hanging out at anyone elses house but mine.

Looking back now I realize how lucky I was to have the kind of family and home that kids felt welcome in. To know that my Mom and Gram would be in the kitchen smiling to greet us as a line of teenagers bounded down the stairs and that my Dad would be in his recliner, tilting the newspaper down just long enough to see who was coming through the door as we whizzed past him in a blur.

My Mom says now "well at least I always knew where you were".

Now all these years later, we have "that" house that all the kids hang out at. We don't have a ping pong or pool table, but we sure do have plenty of food.

If you want to feed a crowd of hungry teenagers, one sure fire way to make a beeline directly to their grumbling bellies is with pasta. Make that pasta taste like a cheeseburger and you have one happy group of kids.

Don't worry it's not overly cheeseburgie. The mustard, pickle and ketchup flavors don't smack you in the face.

Cheesebuger Pasta

Cheeseburger Pasta
Adapted from a recipe at Taste of Home
1 pound penne pasta (or any pasta you like)
1 pound ground beef
1 small onion, finely chopped
1 (14.5 ounce) can no-salt added diced tomatoes
1/8 cup dill pickle relish
1/8 cup Dijon Mustard
¼ cup ketchup
2 teaspoons of seasoning (I used Mrs. Dash)
1 cup cheddar cheese, shredded

Cook the pasta until it is al dente. Meanwhile in a large skillet, cook the beef, onions and seasoning over medium heat until cooked through. Drain any grease. Add in the tomatoes, relish mustard and ketchup. Heat for an additional 5 minutes. Sprinkle with cheese and serve.

Friday, February 17, 2012

Spiced Pear Upside Down Cake

Pear tint

Ahhh pears. One of my favorite fruits.

I love to cook with apples, but when it comes to just picking up and eating a piece of fruit, I'll always pick a pear first.

Bosc, used in this recipe, are my favorites.

I love to let them get really ripe so that when I bite into them, the juice runs down my chin. To me, the sign of perfectly ripened fruit. I am also that type of person who likes her toast on the dark side, the crunchy ends of the lasagna and the bananas when they really ripe.

Spiced Pear Upside Down Cake 1

I told you I was on a breakfast kick didn't I?

I thought this spicy pear cake would qualify as a breakfast type cake...and it did.

Spiced Pear Upside-Down Cake
recipe form Taste of Home
½ cup butter, melted
½ cup coarsely chopped nuts
¼ cup packed brown sugar
2 large pears, peeled and sliced
½ cup butter softened
1/3 cup sugar
1 egg
1/3 cup molasses
1 ½ cup all-purpose flour
¾ teaspoon ground ginger
¾ teaspoon ground cinnamon
½ teaspoon salt
½ teaspoon baking powder
¼ teaspoon baking soda
½ cup warm water

Pour the melted butter into a 9 inch square baking pan. Sprinkle with nuts and brown sugar. Arrange the pears over the mixture.

In a large bowl cream the softened butter and sugar until light and fluffy. Beat in the egg and molasses. Combine the flour, ginger, cinnamon, salt, baking powdered and soda and add it to the creamed mixture alternating with the water. Beat well after each addition.

Spread the batter carefully over the pears. Bake at 350 for 35 to 40 minutes or until toothpick inserted near the center comes out clean. Cool for 10 minutes and invert onto serving plate.


Spiced Pear Upside Down Cake

Monday, February 13, 2012

The little things....

Things that are making me smile now.

Old Photos.

I found this picture of me laying in my great-grandparents yard. I don't remember the picture being taken, but I remember the house and the porch where we would eat graham crackers and butter, or Lorna Doone cookies. I remember the smell of my Papa's cigar and the sound of the tea kettle whistling. Maybe that's where my love of tea originated from?

me at Papas

I just love the peaceful, carefree me in this picture. I thought I might need a little visual reminder of those times so I framed it and it now sits in my living room.

Bright yellow flowers.

yellow 1

I have to confess, I'm not really fond of the color yellow except when it's a coloring a flower. Then I love it. Sunny.

Feeding hungry teenage boys.

There is always a steady stream of teenagers running through my house. Saturday night I had 2 sleep over. They not only enjoyed a delicious dinner (Cheeseburger Pasta - recipe coming soon!) they also awoke, tousled hair and all, to the smell of chocolate chip pancakes and sausage.

pancake collage


Fat Birds.

In addition to teenage boys, I also love to feed the birds. Fat birds make me happy.

fat bird

Enjoy your week!

Wednesday, February 8, 2012

Chocolate Maple Nut Bars

Choc Maple Nut Bars2

Is anybody else in spring cleaning mode early?

I sure am. I don't know why (and no I'm not pregnant). I just have been going through the house with a vengeance lately. It all started with the spice cupboard. I have a skinny little closet near my fridge that holds most of my spices and some cleaning supplies.

I was in a mood and decided to just empty the whole thing out. I put everything on the kitchen table, armed myself with some big ole trash bags and began to purge.

You can't use 3 year old cumin can you? Nope. In the trash it went. These ice cream sprinkles aren't supposed to be in a clump are they? Trash. 10 Swiffer handles? I think I can part with some of these. Doubles and sometimes triples of the same spice. I'm bringing them to Mitchell. We have a little saying at the house. When we don't want something anymore we ask "Mitch it or pitch it?" I'm Mitching the spices. He'll use them.

When I was finished I had 3 trash bags full of stuff, a spanking clean space with lots more room.

I also discovered some things that I had totally forgotten about, like my Watkins Maple extract.

I love maple. Love it. I opened the bottle and took a big sniff. I had to use this in something, so I googled maple extract and found this recipe...Chocolate Maple Nut Bars. Looked pretty easy to make. I was sold.

I did make a few tiny changes to the recipe. I reduced the amount of nuts by a cup. Two just seemed like way to many. I'm glad I did. I also just sprinkled enough chocolate chips over the top to cover the bottom crust. No measuring.

Choc Maple Nut Bars crop. jpg

Chocolate Maple Nut Bars
from Eagle Brand Recipes
For the crust
1 ½ cups flour
2/3 cup sugar
½ teaspoon salt
¾ cup cold butter (12 tablespoons)
1 egg

The topping:
1 can (14oz) sweetened condensed milk
1 egg
1 ½ teaspoons maple extract
1 cup chopped nuts
1 cup chocolate chips

Combine the flour, sugar and salt. Cut in the butter until it looks crumbly. Stir in 1 egg and press firmly into a parchment lined 9x13 inch pan. Bake the crust in a preheated 350 degree oven for 25 minutes.

In a medium bowl beat the condensed milk, 1 egg and the maple extract. Stir in the nuts.

When crust comes out of the oven, let it cool for 10 minutes then top with chocolate chips. I didn’t measure mine I just covered the crust with chips. Top with the sweetened condensed mixture and bake 25 to 35 minutes longer or until golden brown. Cool thoroughly and cut into bars. Store in an air tight container at room temperature.

Choc Maple Nut Bars. jpg

Friday, February 3, 2012

Breaded Cauliflower

Breaded Cauliflower

There are certain recipes that you make that automatically make someone jump into your brain.

You know what I’m talking about. Whenever I make a Devil Dog cake my Pa instantly springs into my mind. When I see Lorna Doone cookies, I see my Papa and Nana having tea at their little kitchen table by the window. When I make breaded cauliflower….I see my Mom standing over a pan of hot oil frying these cauliflower pieces.

Now let give you an example of how good these are. My children, who would not normally touch a piece of cauliflower with a 100 foot pole (yeah a 10 foot pole would not be long enough) eat this. My pickiest eater Evan eats these. Jesse loves them.
 
I know you can usually bread and fry most stuff and get people to eat it, but cauliflower is one of those veggies with a lot of haters.

This recipe makes lovers out of the haters….trust me on this one.

Breaded Cauliflower
recipe from Lisa@ The Cutting Edge of Ordinary
1 large head cauliflower
Seasoned breadcrumbs
3 eggs
Vegetable oil for frying.

Break the head of cauliflower up into flowerets. Place in a large pot and fill with about 2 inches of water. Cover and heat until boiling. As soon as the water boils, turn off the heat. Let the sit for 5 minutes and then check with a sharp knife. The knife should slide in, but with some resistance. You don’t want mushy cauliflower. If it’s not cooked enough, place the lid back on and check again in 5 minutes intervals. Mine were done in about 15 minutes. Drain the water and place cooked cauliflower in the fridge for an hour or so.

Place the seasoned breadcrumbs in a bowl. Mix the eggs in another bowl. Dip each piece of cauliflower in egg, then in the breadcrumbs. Place back in the fridge until you are ready to fry.

Heat about an inch of vegetable oil in frying pan. Fry the cauliflower until golden on all sides. You will have to turn them a few times while they are frying. Place on a paper towel lined plate to cool. You can re-heat these by placing them in a 400 degree oven for about 10 - 15 minutes. Don't nuke them...not good eats.

Breaded Cauliflower 2