Thursday, March 28, 2013

Shrimp & Garlic Orzo with Parmesan

Garlic and Shrimp Orzo1

I'll have a full house for Easter. Everyone crammed into my little kitchen as always.

I've lived at my current residence for over 25 years now and for 25 years I've wanted a new kitchen. Next year (if all goes well) I'll be getting my new kitchen.

I've been saving clippings from magazines and storing ideas up in my head for so long that I can hardly believe it might actually happen. I want to tear down walls, rip up floors and work, work, work for what I've been dreaming about all this time.

I've got everything picked out in my head. We are talking right down to the tiny details. I can tell you what kind of back splash I'll have and what kind of cabinets I want and I can even tell you what the inside of the drawers will look like. I've been planning a long, long time. I'm so ready for this. To be able to cook and bake in a big kitchen without bumping into someone will be wonderful!

So bear with me as I plan my dream kitchen. I might turn to those of you who have been through this before for advice. If you have been through a kitchen re-model and have any advice or tips for me, please let me know. I'm like a big sponge soaking up all that I can.
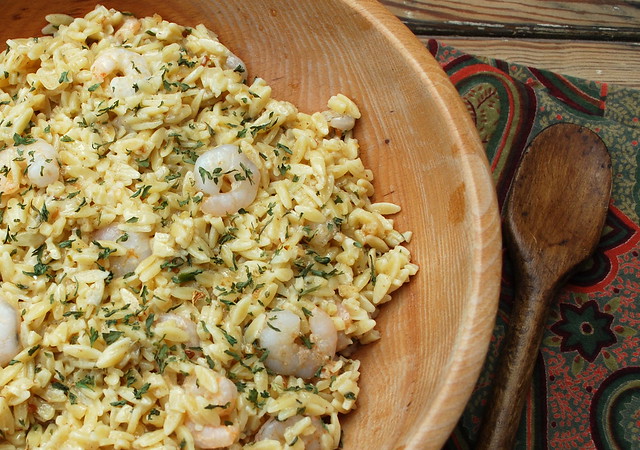
Ok, on to to orzo!

I don't know what it is about orzo that makes me love it so.

It's one of my favorite pastas. It makes the perfect side dish.

One of my favorite recipes is this Everyday Orzo. I make it for parties all the time and it is always a huge hit. It really is one of my all time favorite go-to recipes and now I found this! I wish I could remember where I found the original recipe, but I can't. I scribbled it down on a piece of paper and didn't remember to scribble down where I found it.

I tweaked it quite a bit from the original, so I suppose it's mine now.
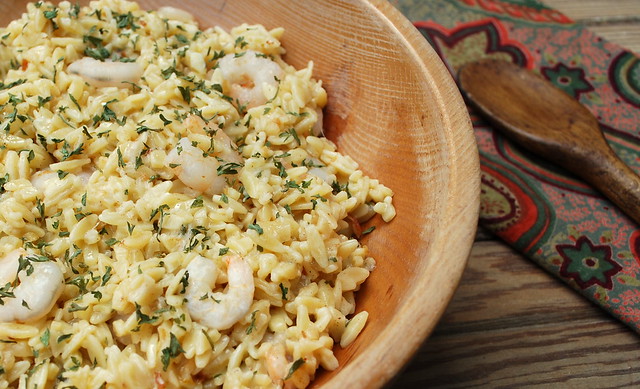

Garlic and Shrimp Orzo 2
Pin It
Shrimp & Garlic Orzo with Parmesan
1 cup orzo
¼ cup butter
2 tablespoons minced garlic
2 tablespoons milk or cream
1 tablespoon chopped parsley
¼ cup Parmesan cheese
Cooked shrimp
Salt & pepper

Bring a large pot of salted water to a boil. Cook the orzo in the boiling water until al dente (usually about 11 minutes). Drain.

Melt the butter in a skillet over medium heat. Add garlic and cook about 5 minutes, or until just browned. Add in cooked orzo, cheese, milk, shrimp and parsley. Season with salt and pepper.

Monday, March 25, 2013

Colossal Sugar Cookies and a winner!

Colassal Sugar Cookies

My youngest son loves sugar cookies.

He tends to lean on the plain side of things. He's a picky eater and not very adventurous at all when it comes to food. He will open up a can of Spaghetti-O's and turn down my homemade lasagna cause it's "yuck" in his words. The boy is crazy.

He doesn't like a lot of ingredients in one dish either. He'll take a peanut butter and jelly (only grape jelly!) over lots of my creations. The nerve!

As soon as he learned to turn on a stove he became obsessed with the slice and bake sugar cookies or those Pillsbury sugar cookies that come with the cute inserts in the middle. My mom my kept buying them for him and he was making a batch every day after school. They became his little obsession. He's actually hid them from his brother, that's how bad it got.

We weaned him off the slice and bakes. Now he waits for major holidays to make a batch.

I knew he would love these big, thick, soft cookies. The m&m's on top just made it even better plus they were all pastely and imprinted with cute little Easter images on them.


Colassal Sugar Cookies 2

You can use a muffin top pan to make these or a whoopie pie pan, which is what I used. At first I thought I was buying a uni-tasker, but after these big cookies came out of the oven, I think I'll be on a big cookie kick for a bit. Who doesn't like a colossal cookie?

I found this recipe on Mountain Mama Cooks. Thanks for the great idea!
Pin It

Colossal Sugar Cookies
recipe from Mountain Mama Cooks
6 tablespoons butter, softened
1/2 cup granulated sugar
1 egg
1/2 teaspoon pure vanilla extract
1/2 teaspoon almond extract
1 cup + 6 tablespoons all-purpose flour
1/2 teaspoon baking powder
1/4 teaspoon salt
1/2 cup M&M candies

Preheat the oven to 350F degrees. In a small bowl, sift together the flour, baking powder and salt; set aside. In a medium-large bowl, with an electric mixer, beat the butter and sugar until light and fluffy. Add the egg and both extracts and mix until well blended. Slowly add the flour mixture and mix just until combined. Divide the dough evenly between a prepared 12-cavity whoopie pie or muffin top pan, pressing dough down slightly. Decorate with M&M candies. Bake for 10-11 minutes until puffy and sides are golden. Remove pan from oven and let cookies cool completely on a cooling rack. Makes 12 cookies.

WINNER OF THE GIVEAWAY!!

Congrats to Jackie!

Yeah Jackie! Please use the contact me button to send me your mailing address!

Monday, March 18, 2013

Bits and Pieces and a Giveaway

So, spring is almost ready to poke it's head in the door and I've got an early case of spring fever. I'm dreaming of digging in my garden and getting my hands dirty. I'm already looking forward to picking out which veggies we'll grow and all the things I want to accomplish in the yard.

I thought a giveaway at this transition period between winter to spring might be a good idea. More coming up on that. I wanted to share a few things with you.

First of all look at this beautiful little bowl that I received in the mail about a month after Moose passed. I can't tell you how touched I was when I opened up the package and saw this:

Moose collage


I had purchased some items from Eileen's shop Say Your Piece on Etsy years ago. She has a great little shop. I encourage you to visit and check out all the beautiful custom and personalized ceramic work she does.

So this package arrives out of the blue and I'm thinking to myself "I didn't order anything". I opened it up and was in a puddle of tears, not only because the dish was so beautiful, but because Eileen had taken time out of her busy life to make and send this to me. I am so thankful that there are truly special people like her in the world. She touched my heart with this precious gift that I'll cherish forever. Thank you again Eileen.

I also had this amazing portrait done of Moose. It's by a local artist named Laurelin Sitterly who owns Blockhead Craftwerks. She draws gorgeous animal portraits and even donates part of the purchase price to local animal charities.

I was in tears again when I saw this portrait of Moose and his baby bunny.

Moose finished

She captured his soul and spirit in this. Another one to cherish.

Thank you Eileen and Laurelin.
Your works of art keep Moose's memory alive.

So because spring is around the corner and because Thursday it's my birthday and because I haven't had a giveaway in a good long time, I've got a few handpicked items I'd love for one lucky winner to own. They are a bit of a mish-mash. I've been picking up things that have caught my eye over the past few months. First up is one of my all time favorite cookbooks. Cristina Ferrare's Big Bowl of Love.

Big Bowl

I own and love this cookbook. I was a big fan of Christina's show and I'm an even bigger fan of her cooking....and my friends Todd & Diane (White on Rice Couple) took all the gorgeous photographs in this book. It's a stunner filled with the most delicious recipes you can imagine. I'd love for it to be in someone kitchen.

Second item - might sound a little strange, but trust me on this one, it's a uni-tasker that I love. A silicone butter softener.

Butter

How many times have you gone to make a recipe and you see these words next to the butter "room temp" or " softened"? Ugh. I forgot to take the butter out and now I have to wait hours before I can make this recipe. Well wait no more. You pop this baby in the microwave, remove, then slap one or two sticks of butter in it and in about 8 minutes you have perfectly softened butter to use in your recipe. The forgetful me loves it! It really works!

Third - this little pitcher just called to me. I love the color and the design. It's the perfect size to hold some milk or cream to go with you tea and it looks adorable on the table. I had to have it and I wanted one of you to have it too!

pitcher

Last but not least the infamous half roll pan.

giveaway 4

Back in 2011 I posted a recipe for a Swedish Almond Cake. Immediately following I had many inquiries as to where the pan could be purchased. I must have had 20 people trying to find that darn pan. Mine was bought eon's ago. I did find some half roll pans and bought quite a few with future giveaways in mind. I'm adding this into the winners package. I can tell you that even if you only make that Swedish Almond Cake and nothing else in this pan, it's so worth it.

So there is my little giveaway. It's open to everyone. All you have to do to enter is to answer this question:

What's your favorite thing about spring?

One lucky reader has a chance to win it all!

If you don't have a blog, please leave me email address to contact you (no email and I'll move on to the next name).

There are three ways to enter: (1) leave a comment on the blog (2) go “like” The Cutting Edge of Ordinary on Facebook or (3) Already a fan? Just leave a comment here to let me know! 

Giveaway ends on Friday, March 22nd at midnight EST. Good Luck!

Friday, March 15, 2013

Blueberry Croissant Puff

Blueberry Croissant Puff

I love Sunday morning breakfasts. There is no rush. There is no scrambling to get out the door.  We sleep in a little, there is the Sunday paper to read, our mugs stay out most of the day, it's just lazy and loungy and everything good about a day of rest.

Twice a month I try and think outside the box and make something different for breakast. My friend works 3rd shift as a nurse so every other Sunday she stops by after church to join us for a cuppa tea and breakfast.

Let me confess, when it comes to breakfast foods, I'm not a French toast/pancake/waffle kinda girl. Breakfast foods for me are eggs, bacon, fruit, cereal, a good bagel. That's just how I am.
 
If you love French Toast, you'll love this. If you love bread pudding, you'll love this. If you love blueberries, you'll love this.

Tati came last weekend and she is a total French toast/pancake/waffle kinda girl. So I made this, thinking of her breakfast bliss and not my own but boy was I surprised.

This was so light, delicate and but still had that custardy texture.  It was melt-in-your-mouth scrumptious. I made a 8x8 pan and 3 of us devoured the whole thing (well we sent one piece home for John, Tati's husband).

Blueberry Croissant Puff3

The next time I make these I'm going to double the batch.

I used store bought croissants, cause who in the heck has time to make their own croissants? Please don't answer me if you just said you do.

Blueberries worked perfectly in this. Don't love blueberries?  Substitute any fruit you like.

You can sprinkle the top with powedered sugar when it's done, but we just wolfed it down straight outta the oven.

Pin It
Blueberry Croissant Puff
recipe from The Girl Who Ate Everything
Double the ingredients to make a 9x13 pan.

3 large croissants, cut up in small pieces (about 5 to 5 1/2 cups). I used mini croissants and just filled them up to the 5 1/2 cup line)
1 cup fresh or frozen blueberries
1 package (8 oz.) cream cheese, softened
2/3 cup sugar
2 eggs
1 teaspoon vanilla
1 cup milk

Preheat oven to 350 degrees.

Place croissant pieces in a 9 inch square pan. Sprinkle with blueberries.

Beat cream cheese, sugar, eggs and vanilla in medium bowl with electric mixer until well blended. Gradually add milk, beating the whole time. Pour evenly over croissant pieces. Let stand 20 minutes.

Bake at 350°F for 35 to 40 minutes or until set in center and golden brown. You may want to cover it with foil for the last 10 minutes if the tops are getting too browned. Serve warm sprinkled with powdered sugar.

Monday, March 11, 2013

Ramen Noodle Bake

Ramen Noodle Bake

Please don't let the word Ramen stop you from making this recipe.

I know it sounds weird...Ramen in a casserole. When I first saw this I was like...Ramen? Really? But it so works. Trust me on this.

I buy Ramen. I think most folks have at one point or another and if you went away to college, I'm sure lots of you bought Ramen. It's cheap and it fills your belly.

My kids perfer Yakisoba Noodles to the Ramen packets. They are usually eaten by hungry teenagers on weekends for lunch or "snacks" in my house. I buy them by the dozens and they get eaten up just as fast as I buy them.

When you think about it....it's just a dried noodle, and you're not using all four of the flavor packets from the four packs of Ramen that you need for this recipe, so the sodium content isn't that bad.

I made this recipe for three of us. My husband was at a game dinner with my brother, so I had my nephew and youngest son home at the time. I decided to try this recipe out on them. I have to admit when I was making it was was thinking to myself "I hope I'm not wasting all these ingredients on this". So out of the oven it came, and down the stairs came the two boys who were STARVING (aren't they always?) and they loved it. They went back for seconds. Half the pan was gone just from the two of them. A hit.

It really was delicious. The Ramen become perfectly cooked and almost melt in your in your mouth. It was like a cross between lasagna and american chop suey.

Try it! Honest.

Ramen Noodle Bake 1

Pin It

Ramen Noodle Bake
4 packages Ramen noodles - one must be beef (reserve ONE beef flavoring packet)
1 - 26 ounce jar spaghetti sauce
1 lb. cooked ground beef or Italian sausage
2 cups mozzarella cheese, divided
3 1/2 cups water

Preheat oven to 400 degrees.

Break up ramen noodles into a greased 9 x 13 inch pan. They should cover the bottom of the dish.

Sprinkle the cooked meat over dry noodles (I seasoned my beef when I was cooking it). Pour the jar of sauce over the top. Sprinkle the beef flavor packet over the sauce. Sprinkle one cup of the cheese over the top of sauce. Gently mix together. Pour the water over the top. Cover tightly with aluminum foil and bake 40 to 50 minutes or until liquid is totally absorbed.

Remove from oven and remove foil. Sprinkle the remaining cheese over the top. Return to oven for 5- 10 minutes until the cheese is melted and bubbly.

Friday, March 8, 2013

Oreo Peanut Butter Brownies

Oreo Peanut Butter Brownie 2

I know, I know.......Oreos AND peanut butter wrapped up in a brownie!

That's just crazy.........crazy good.

I had seen these on Pinterest a hundred times from dozens different sites. What isn't on Pinterest. Yes, I am addicted thank you very much. How did I ever spend a moment without it? So much to pin, so little time. I honestly think I could blog a years worth of recipe I get from Pinterest without any problems. I jumped on the band wagon at the last minute. I didn't even start my page until late last year. I'm always the last one to join. *sigh*. If you'd like to follow me here's my link: Cutting Edge Pinterest.

Several different bloggers had made these, and they all had pretty positive comments, so I figured I just had to make them.

I'm not a huge peanut butter fan. I can take it in small doses. Looking back I should have put a bit more peanut butter in these. I used about a tablespoon, I should have used a heaping tablespoon on top of each cookie, but it worked.

It worked out very well. You could ask my kids and my cousins and my friends. They all had some.

Oreo Peanut Butter Brownie

The recipe is super simple. Mix up some brownies, smear some peanut butter on some Oreos, slap 'em in a muffin pan, pour the brownie mix over the top and bake. Easy. They are a bit decadent and rich. I had a half of one and that was plenty for me (again, peanut butter just isn't my thing).

These would be great to take to a party. Portable and delicious for all the peanut butter lovers out there!

Pin It

Oreo Peanut Butter Brownies
1 box of family size brownie mix (18.3 oz) prepared according to package directions
Oreo cookies
Peanut Butter

Preheat oven to 350. Line muffin cups with paper liners. Spray each liner lightly with cooking spray so your brownies won't stick.

For each cupcake cup spread a heaping teaspoon of peanut butter over 2 Oreo cookies and stack them on top of each other. Spoon the brownie batter over each of the stacked Oreos letting it run down the sides of the cookies. Bake for 18 to 20 minutes, until brownies are cooked through. Let cool before eating.

I used a whole package of Oreos and I had enough batter to finish the whole bag. I baked any left over brownie batter in the muffin liners.

Wednesday, March 6, 2013

Simple Roasted Carrots

Roasted Carrots with thyme 2jpg

I've been feeling a bit melancholy lately.

Maybe it's because I'm done with winter (says the girl who loves the snow) or maybe it's that my beloved Moose has been on my mind so much or because I've quarreled with someone I love and it's left a pit in my stomach.

I can't quite put my finger on it.  I'm sure its a combination of it all. It's showing on my face too apparently. I was in a meeting at work on Monday and one of my co-workers, who I've been working with for 30 years, pulled me aside after the meeting was over and asked "Are you ok?" "You look so sad, and you never look sad".

I explained that I was missing my dog, and lucky for me, she feels the same way about her pooch as I felt about mine, so we had a little cry together. 

I feel like I'm still in a bit of a haze. I'm hoping spring, and all that comes along with it, will brighten my days. I've been cooking up a storm and cleaning up a storm too. I've got ideas and plans and lots of projects swirling around in my head that should kick the dull-drums straight outta me.

I'm coming around slowly.

So I spent most of the past weekend in the kitchen, trying out some new recipes and putting my own twist on a few old ones. I started with one of my favorite veggies - carrots. One of my most favorite ways to eat any veggie is roasted. Carrots are always at the top of the list. These are so simple to make. I hold them at the stem and eat them in three bites - gone. They taste better than candy to me.

Roasted Carrots with thyme 1

I bought these adorable stemmed carrots at my local BJ's Wholesale Club. If you can find them with the stem still on, I highly recommend you pick some up and try this recipe. If not you can use regular ole carrots peeled and sliced in half length-wise if they are too thick.

Pin It
Simple Roasted Carrots
recipe from Lisa@ The Cutting Edge of Ordinary

Line a baking sheet with parchment. Place the carrots on the pan and drizzle with olive oil. Toss to coat evenly. I added some fresh thyme and then sprinkled generously with salt and pepper.

Bake at 425 for 30 - 40 minutes, or until the carrots are soft and sweet. See simple.

Monday, March 4, 2013

3 Months

Moose bw

his tattered bunny still sits on my bureau

don’t think I will ever be able to bring myself to part with it

I walk by and smell it from time to time

breathing the last bits of him in.

the big basket on top of the armoire that is filled with his brushes, bandanas and grooming items has sat untouched.

can’t bare it just yet

losing all the little pieces of his life hurts

there are still mornings when my foot touches the bedroom floor and I expect to feel his fuzzy coat between my toes

hear his snoring

call out his name

never has the house felt so empty when I am alone in it

no clicking toe nails on the hardwoods

no dog beds to trip over

no water dish to fill

the ride home every single night is tearful

he’s not there to run down the driveway to meet me

to lay beside me cuddled under blankets

to walk in the woods

to cheer my sadness

my constant companion gone

my heart still very broken

Friday, March 1, 2013

Banana Blueberry Streusel Bread


Blueberry Banana Bread

Don't you always have bananas going mushy in your house?

Please say that you do. I always do. When I don't have bananas in the house I hear:

"Mooooommmm, we don't have bananas?" "Are you going to buy some bananas?"

When I do have bananas in the house I say:

"I'm the only one in this house eating the bananas. Eat them before they go bad or we'll have a fruit fly infestation".

There is never banana harmony at my house. We either have too many or too little.

And why is it that once I leave the house I can never remember if I have bananas at the house or not. I'll be standing at the grocery store, looking at the bananas, asking John "Do we have bananas?" We never know.


Blueberry Banana Bread sliced

So I make a lot of banana bread cause I just can't stand to throw away perfectly good mushy bananas.

Sometimes I'll come home and some or all of my bananas are missing and my Mom will say: "I took some of your mushy bananas so I can make a banana bread". I must have inherited that from her.

I made this bread during the blizzard. We had power and I was a baking fool. This was partial payment to my neighbor with the plow along with chocolate chip cookies.


Blueberry Banana Bread. 1jpg

My little trick with any banana bread that I make is to whip the bananas before I use them. This lightens them up an little and doesn't make them quite so heavy. (see this old and ugly post from 2008)

I always have frozen blueberries in my freezer from my summer harvest. We pick boatloads of them. They are particularly welcome when there is 31 inches of snow outside your door. Use fresh if you have them, but the frozen ones work perfectly fine too.

Pin It

Banana Blueberry Streusel Bread
slightly adapted from a recipe at Kitchen Tested
3 or 4 ripe bananas (whipped)
¾ cup sugar
pinch salt
1 egg
4 tablespoons unsalted butter, melted
1 teaspoon ground cinnamon
1 teaspoon baking soda
1 Tablespoon water
2 cups flour
1 cup fresh or frozen blueberries

Streusel Topping
1 Tablespoon flour
2 Tablespoons light brown sugar
2 Tablespoons old-fashioned oatmeal
2 Tablespoons unsalted butter, melted

Oven to 350. Add the sugar, salt and egg to a mixing bowl and stir until well combined. Slowly drizzle in the butter, stirring constantly. Add the cinnamon and stir to combine.

Separately, mix the baking soda and water and add them to the bowl. Add in the flour and stir until just moistened, then add the whipped bananas and stir to combine. Drop in the blueberries and gently stir to combine. Pour the batter in to a greased loaf pan.

For the Streusel Topping:

Mix the flour, brown sugar, and oatmeal then add the melted butter. Spread the mixture over the banana blueberry bread batter and place the pan in the oven for 50-60 minutes. Bread is ready when a toothpick inserted into the middle comes out clean.